> ## Documentation Index
> Fetch the complete documentation index at: https://docs.graphext.com/llms.txt
> Use this file to discover all available pages before exploring further.
# Manage teams
> Collaborate with your team mates and organize your projects in an efficient way
A team, is an organizational level designed to enhance collaboration among teammates. You can create **unlimited projects** within a team, **invite various users** to join, and assign them specific roles—**Viewer, Member, or Admin**—to tailor their access and capabilities according to their responsibilities. [Learn more about roles](/documentation/manage-workspace/manage-teams#type-of-roles).
Teams also come equipped with their own integrations, allowing members to leverage these tools according to their roles. Depending on their permissions, users can create new projects from these integrations, create new ones or edit existing onsecuritypolicyviolation. More details are available on our **Integrations page**.
The sidebar provides quick access to all teams you belong to. For ease of access, you can pin your most visited teams, ensuring they are always readily accessible. This page is divided into two main sections: 'Pinned Teams' for your frequently accessed teams and 'All Teams' for a comprehensive view of every team you belong to."
## How to create a new team
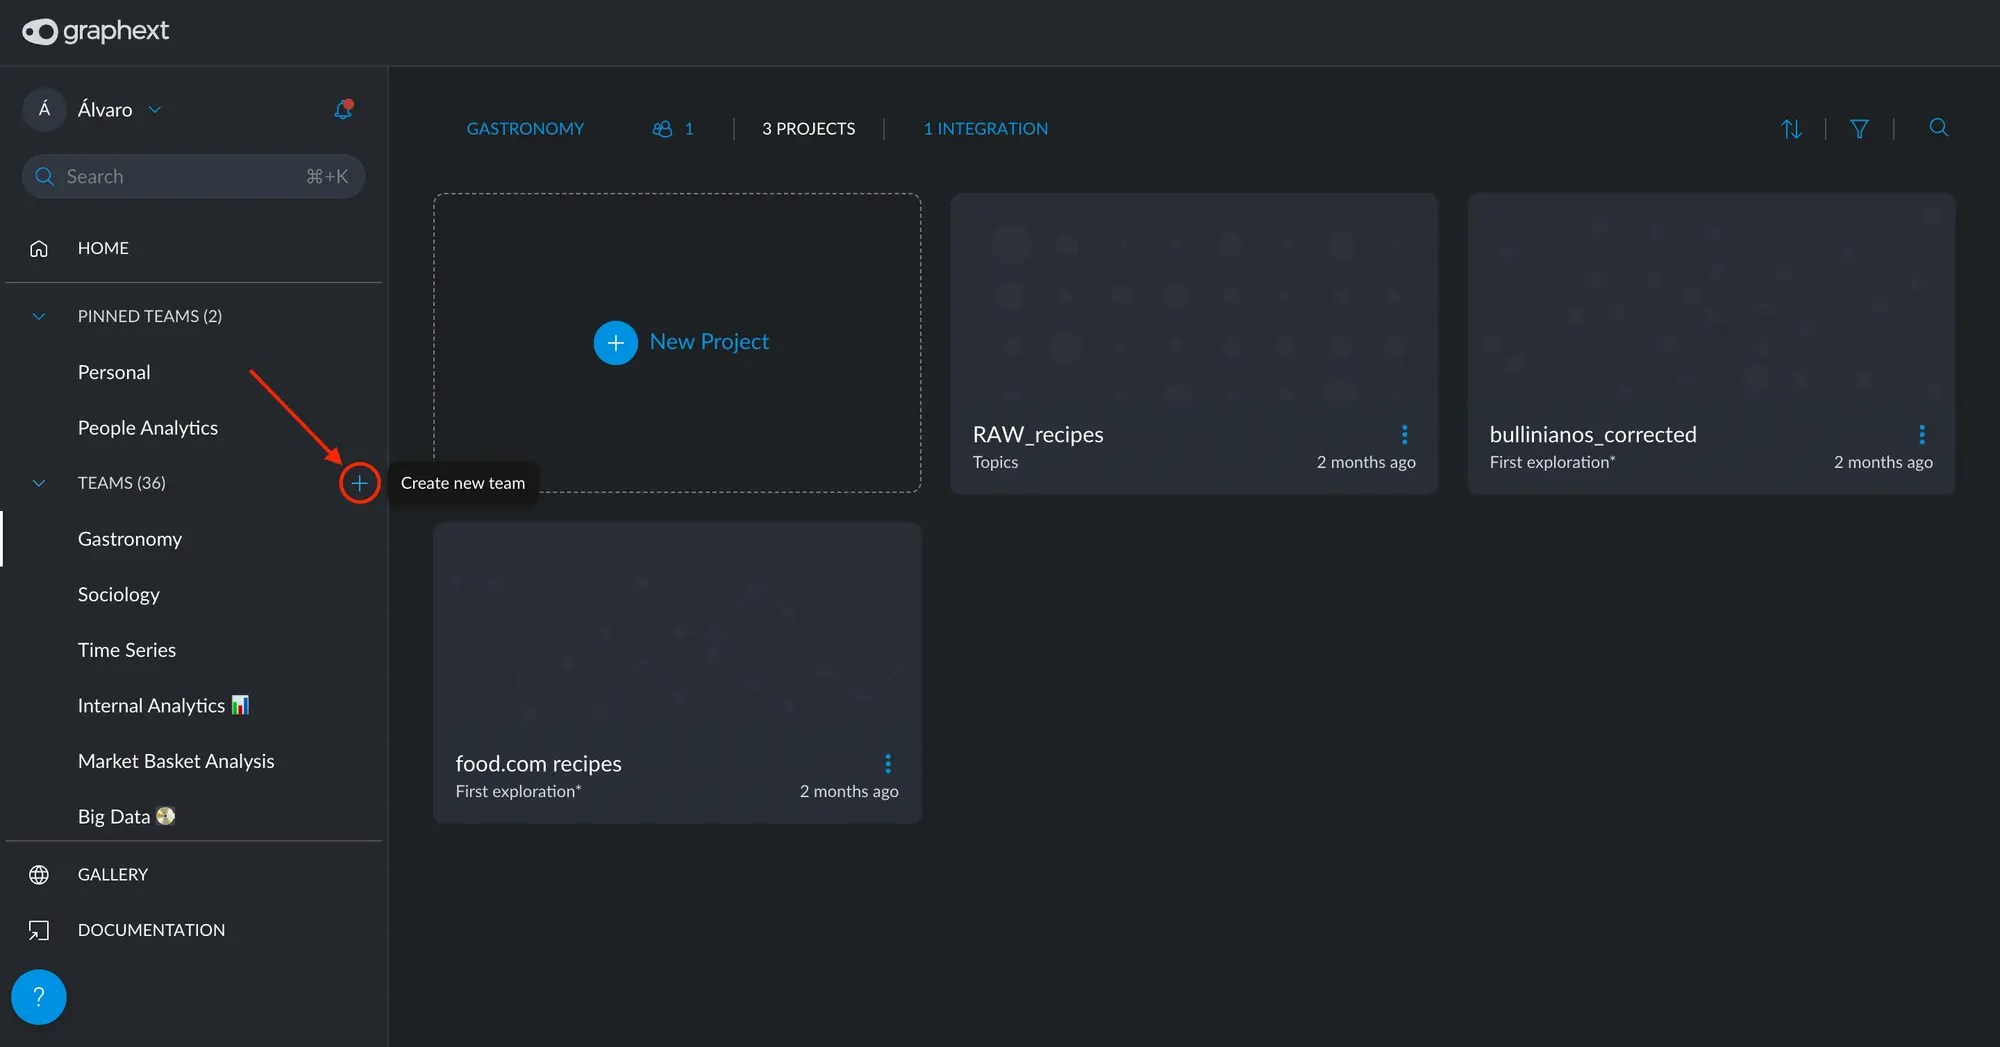
In the sidebar, where all your teams are listed, creating a new team is straightforward and quick. Simply **hover over the teams bar** and **click on the plus button** to get started. All you need to do is give your new team a name, and you're all set to invite colleagues, start new projects, and configure integrations to suit your team’s needs.
 ## Team members
### How to add or remove team members
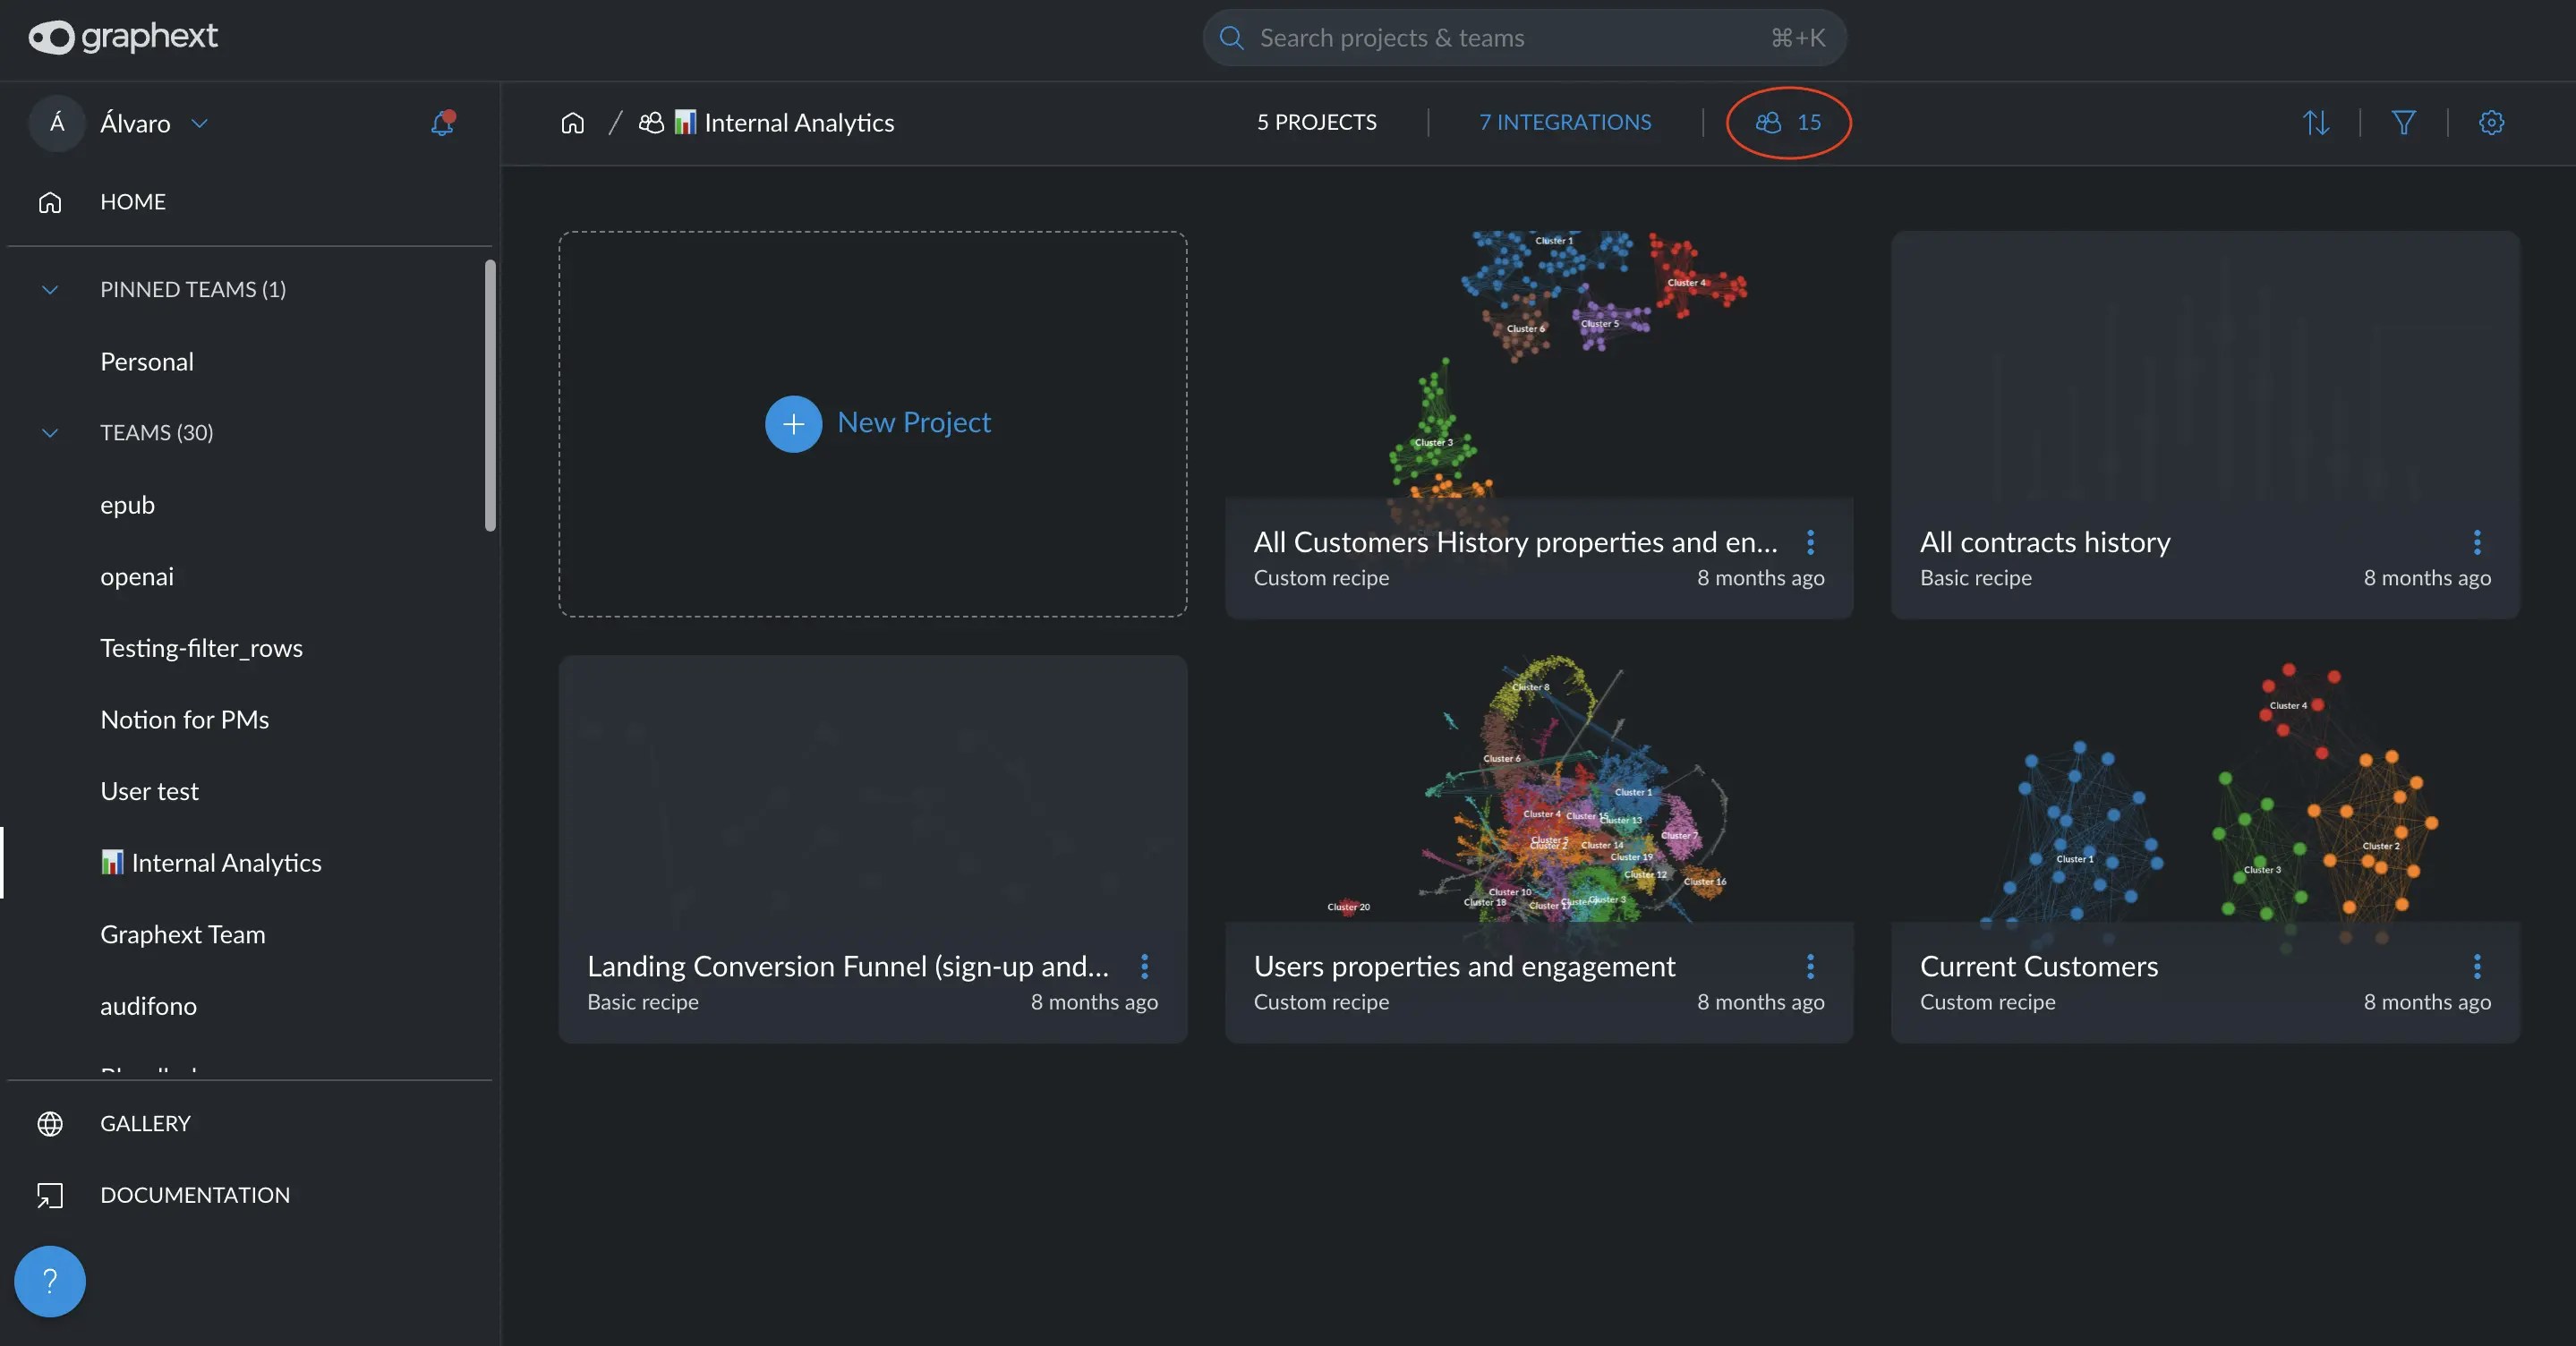
Navigate to the desired team using the side panel. Once inside a team's
section, you'll find **key details on the top bar**, including the number
of team members, which provides a quick overview of your collaborative
environment.
## Team members
### How to add or remove team members
Navigate to the desired team using the side panel. Once inside a team's
section, you'll find **key details on the top bar**, including the number
of team members, which provides a quick overview of your collaborative
environment.
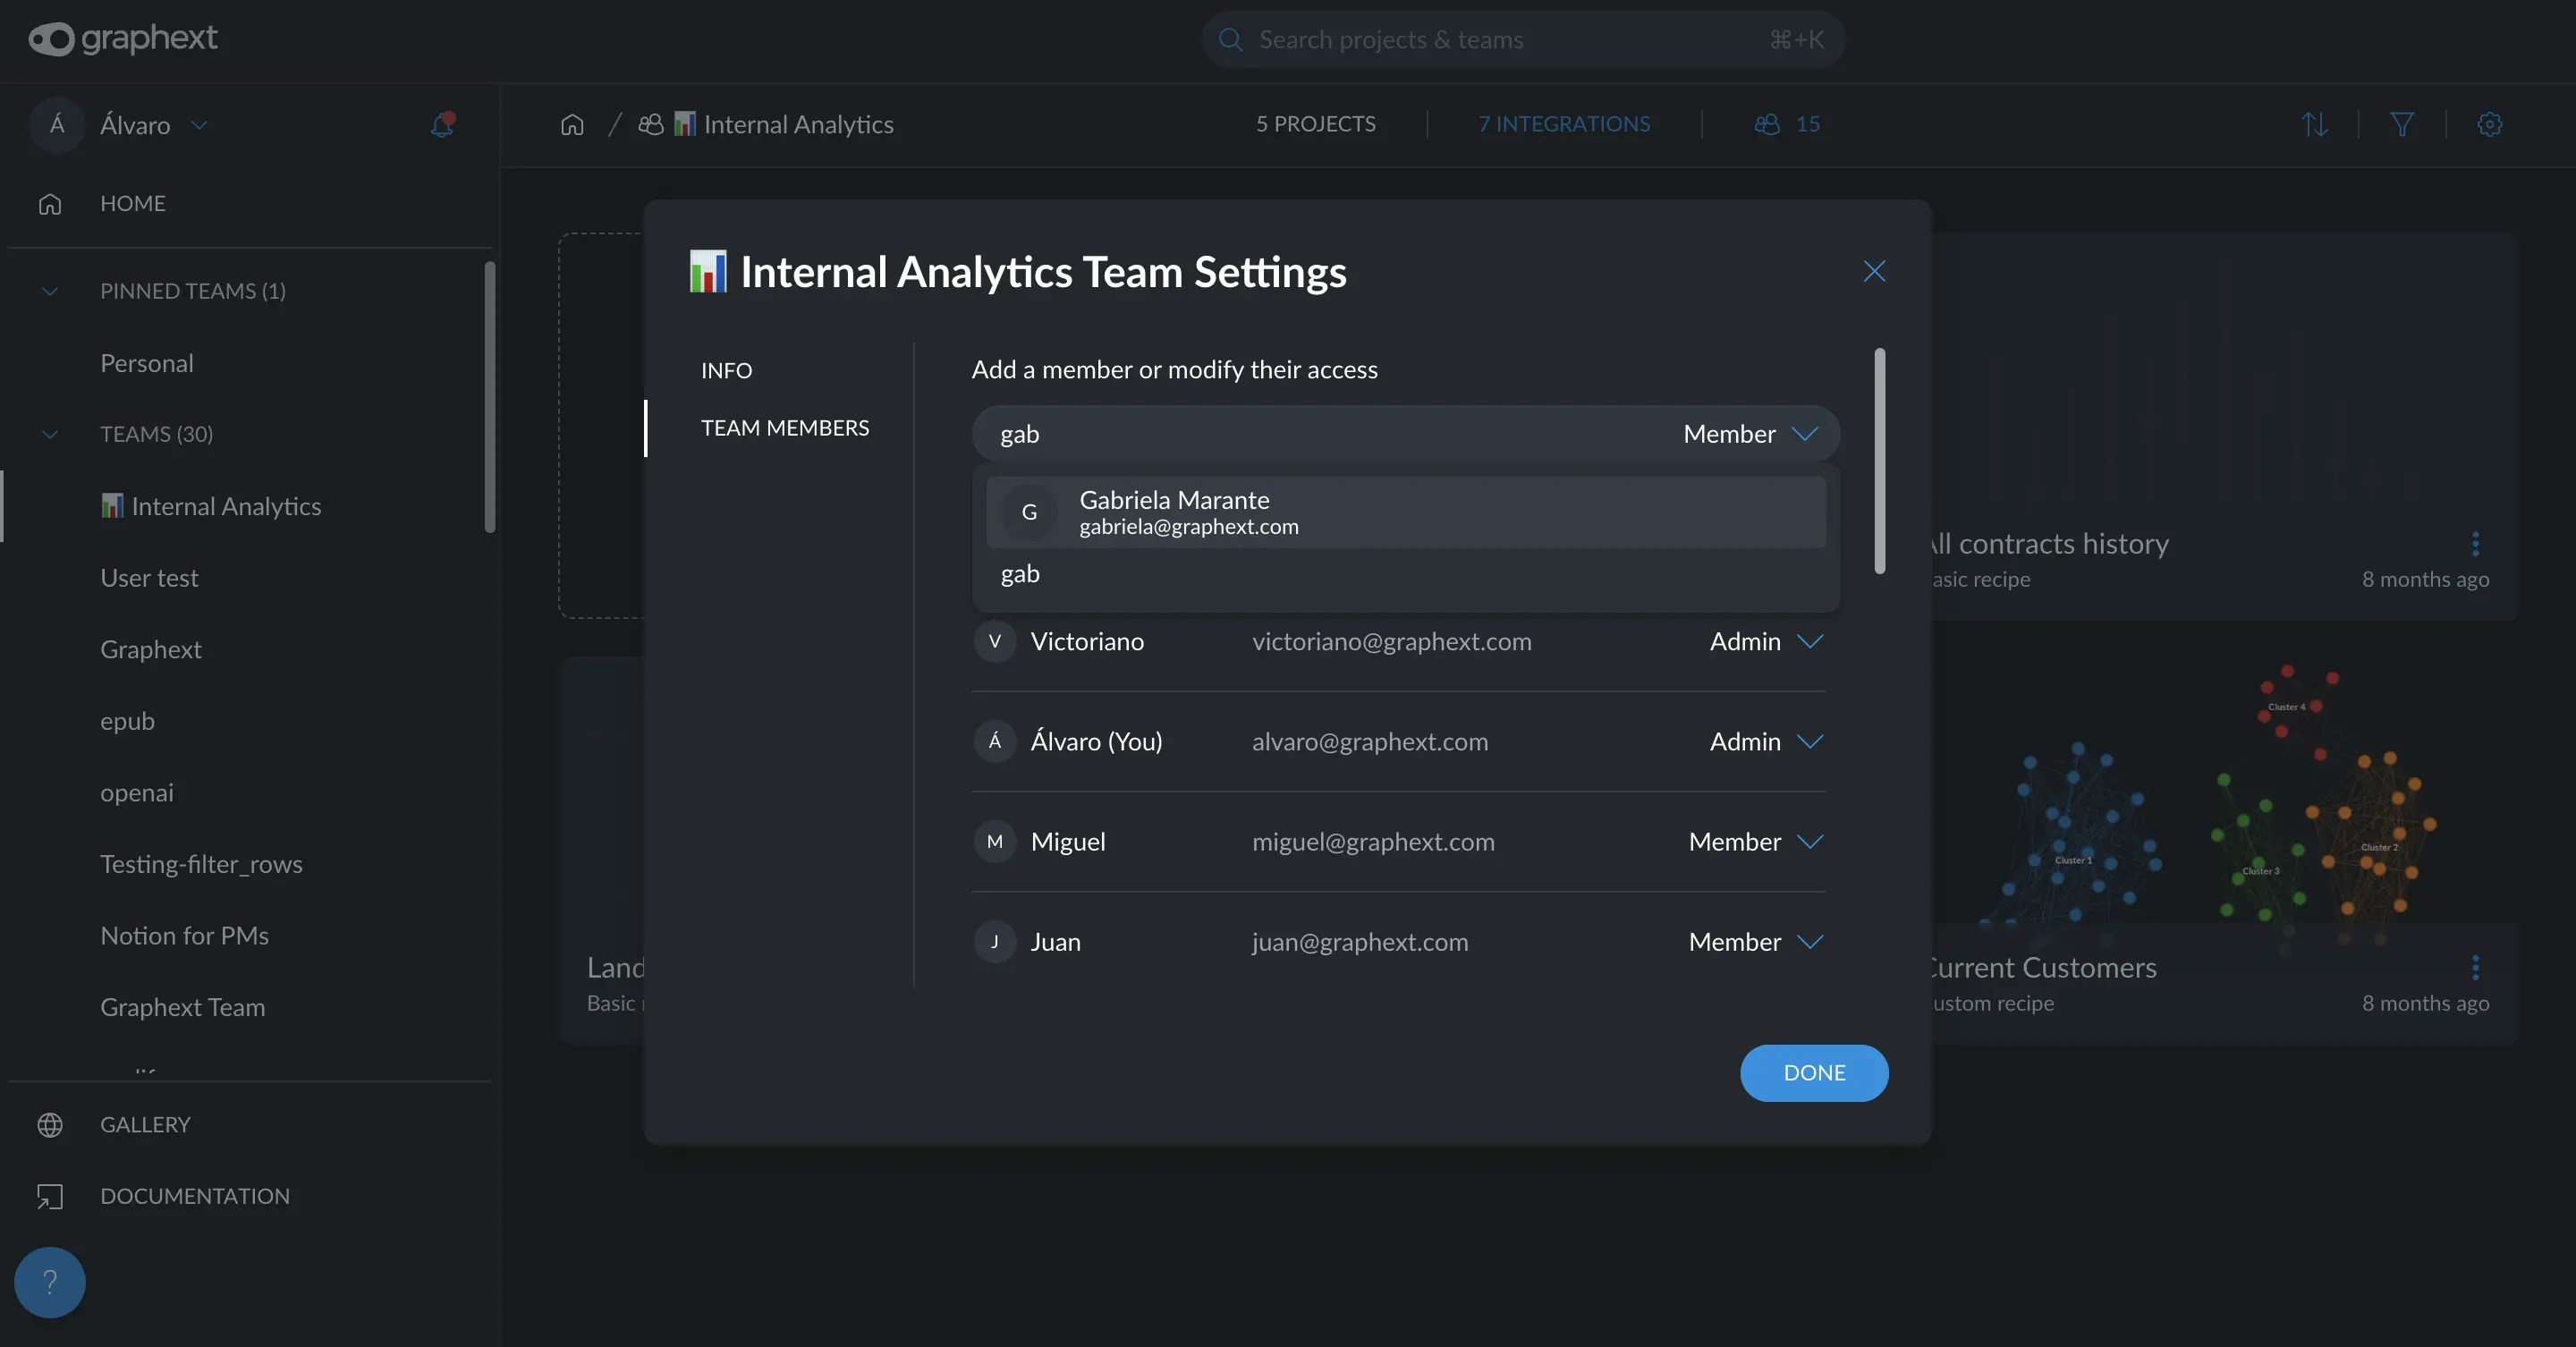
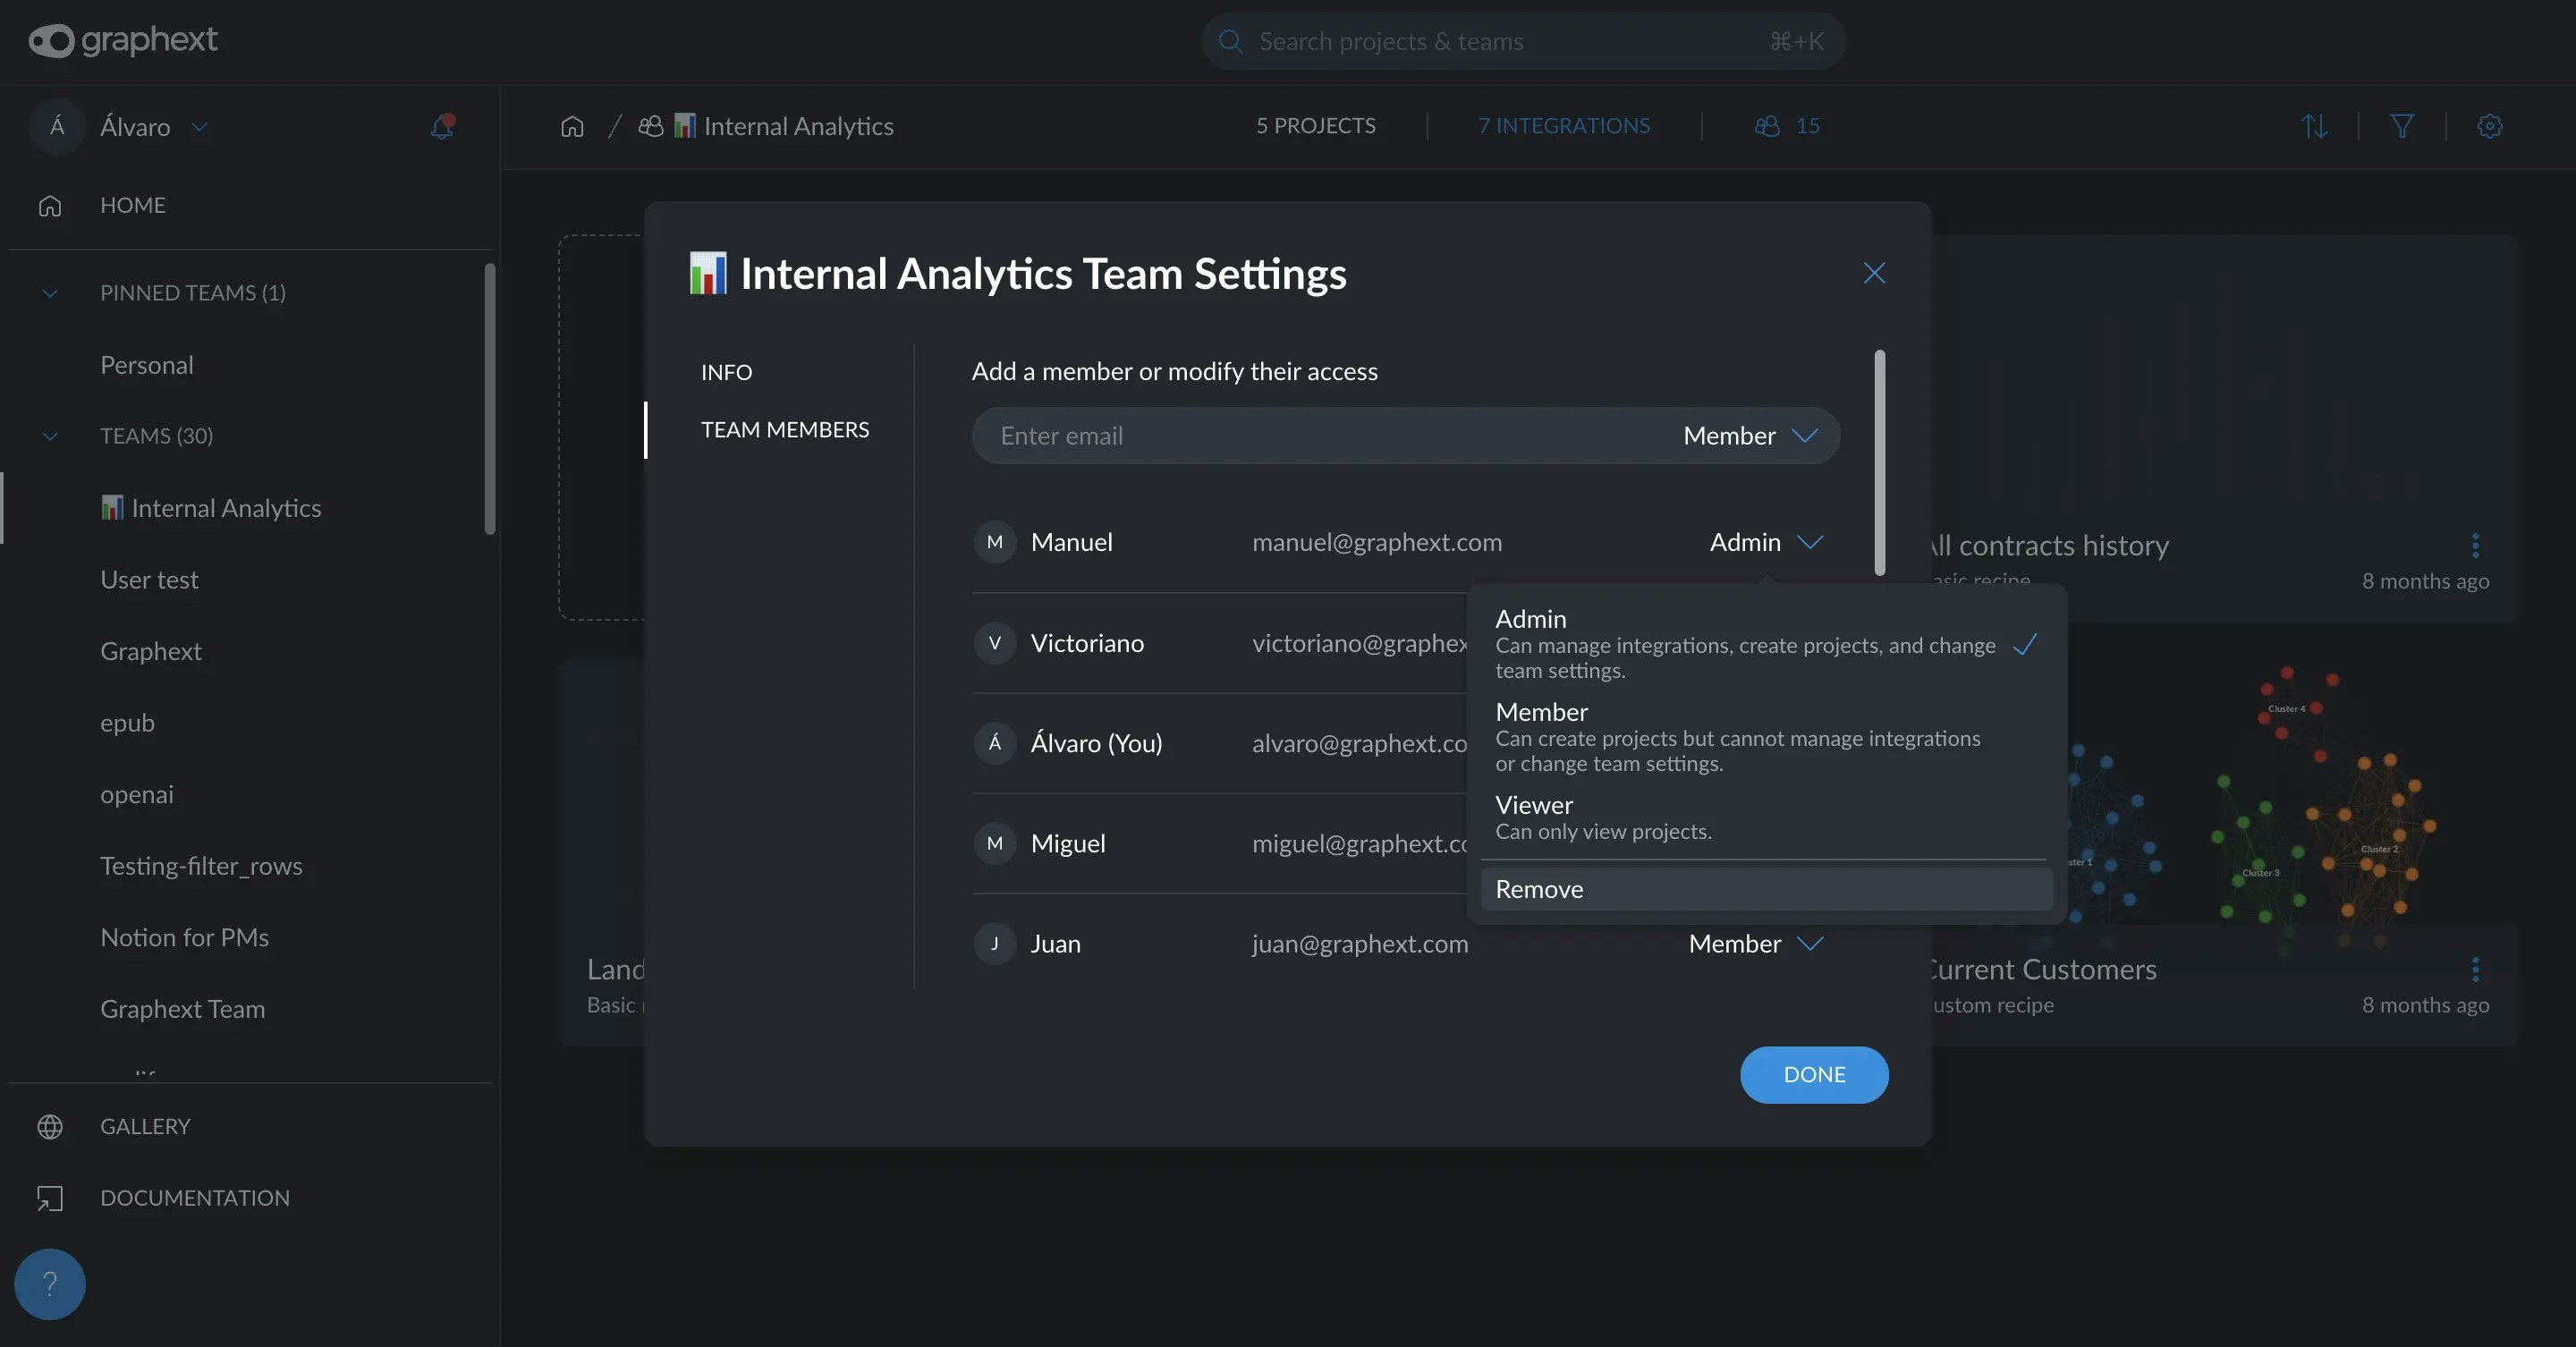
 Clicking on the team member icon will open a modal displaying the
information about the members of the team. Within this window, you can
search for and **input the email** of the user you wish to invite. During
this process, you will also **select the role** you want to assign to the
new member, tailoring their access and permissions within the team.
Clicking on the team member icon will open a modal displaying the
information about the members of the team. Within this window, you can
search for and **input the email** of the user you wish to invite. During
this process, you will also **select the role** you want to assign to the
new member, tailoring their access and permissions within the team.
 If you are an admin, in this same window, you will be able to change the
role or remove any member of the team
If you are an admin, in this same window, you will be able to change the
role or remove any member of the team
 ### Type of roles
In Graphext, we have established three distinct roles to accommodate various levels of access and control within teams. These roles ensure that team members can perform their tasks effectively while maintaining necessary security and organizational standards:
* **Admin**: As the most privileged role, Admins have comprehensive control over the team's dynamics. They can manage integrations, create new projects, and modify team settings, allowing them to tailor the team environment to suit specific needs.
* **Member**: Members have the ability to create projects, which enables active participation in ongoing tasks and initiatives. However, they do not have permission to manage integrations or alter team settings, maintaining a focus on project development without access to higher-level administrative functions.
* **Viewer**: Viewers have a more restricted role, designed primarily for oversight and monitoring. They can only view projects, making this role ideal for stakeholders or team members who need to stay informed about progress without directly altering project content or structure.
## How to pin and reposition a team
In Graphext, the functionality to pin teams is designed to streamline your workflow by making frequently visited teams more accessible. Pinning a team moves it to a dedicated section at the top of your interface, ensuring you can find and access these teams quickly, enhancing your efficiency. Here’s how you can pin a team:
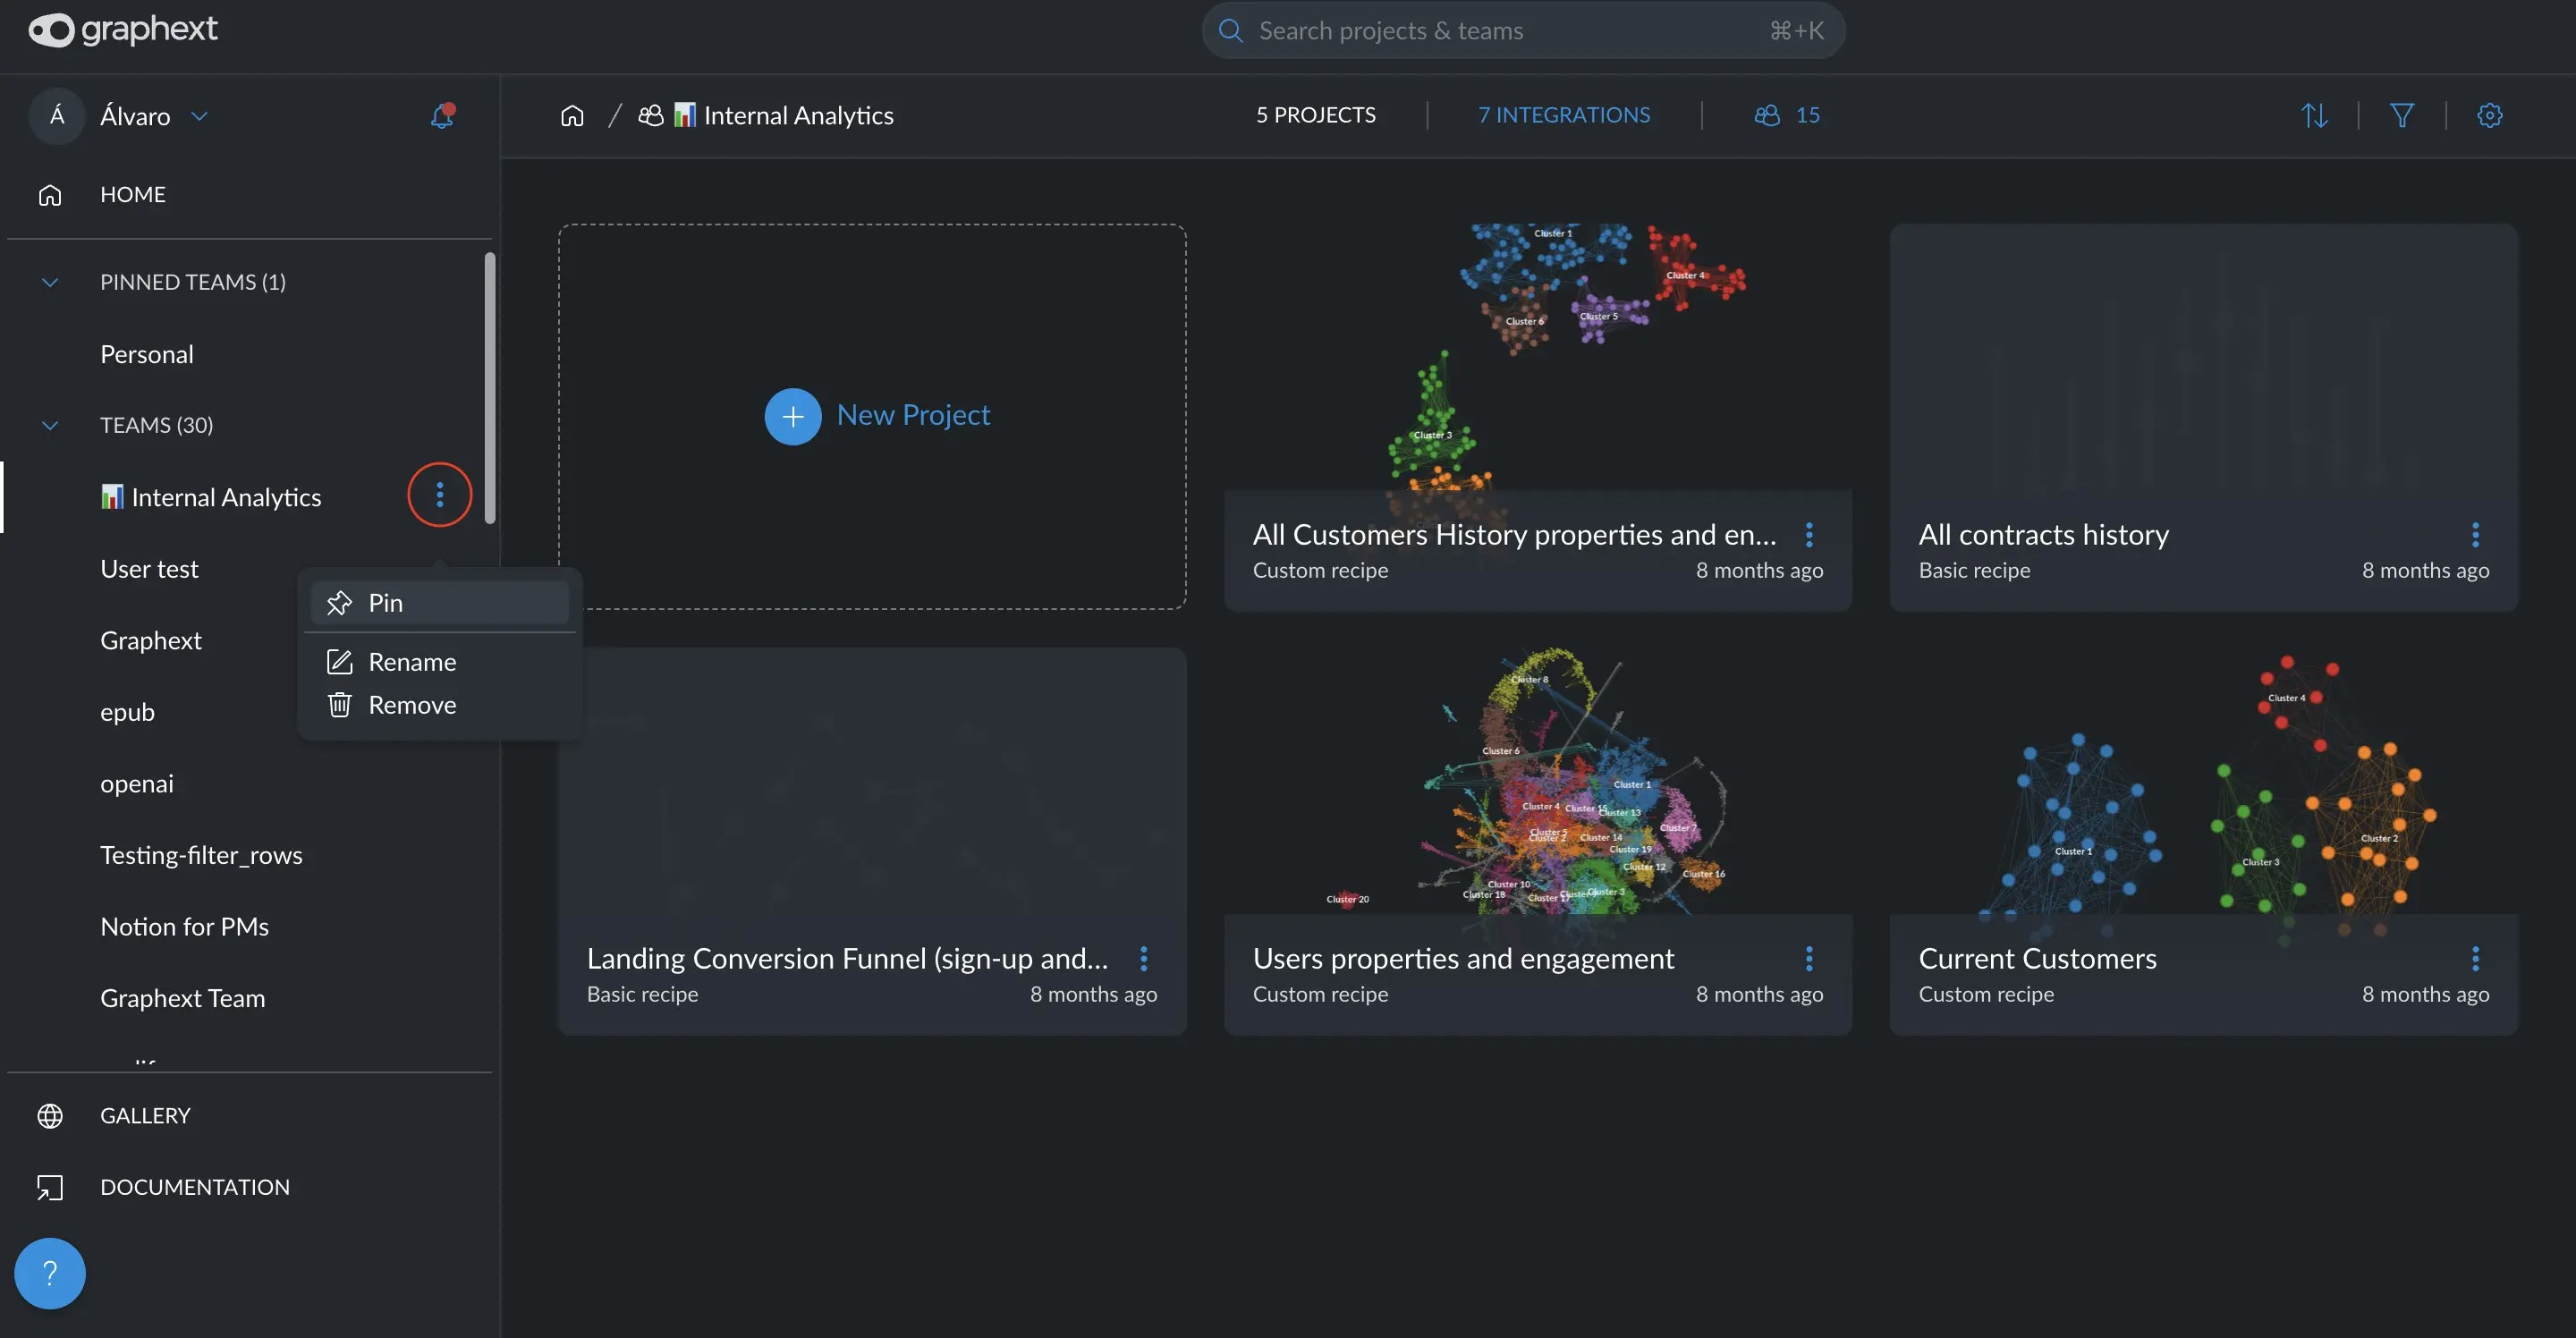
Simply move your cursor over the team you want to pin. A menu icon will
appear on the right side of the team's name.
Click on the menu icon. A list of options will appear. From these, select
the **Pin** option.
### Type of roles
In Graphext, we have established three distinct roles to accommodate various levels of access and control within teams. These roles ensure that team members can perform their tasks effectively while maintaining necessary security and organizational standards:
* **Admin**: As the most privileged role, Admins have comprehensive control over the team's dynamics. They can manage integrations, create new projects, and modify team settings, allowing them to tailor the team environment to suit specific needs.
* **Member**: Members have the ability to create projects, which enables active participation in ongoing tasks and initiatives. However, they do not have permission to manage integrations or alter team settings, maintaining a focus on project development without access to higher-level administrative functions.
* **Viewer**: Viewers have a more restricted role, designed primarily for oversight and monitoring. They can only view projects, making this role ideal for stakeholders or team members who need to stay informed about progress without directly altering project content or structure.
## How to pin and reposition a team
In Graphext, the functionality to pin teams is designed to streamline your workflow by making frequently visited teams more accessible. Pinning a team moves it to a dedicated section at the top of your interface, ensuring you can find and access these teams quickly, enhancing your efficiency. Here’s how you can pin a team:
Simply move your cursor over the team you want to pin. A menu icon will
appear on the right side of the team's name.
Click on the menu icon. A list of options will appear. From these, select
the **Pin** option.
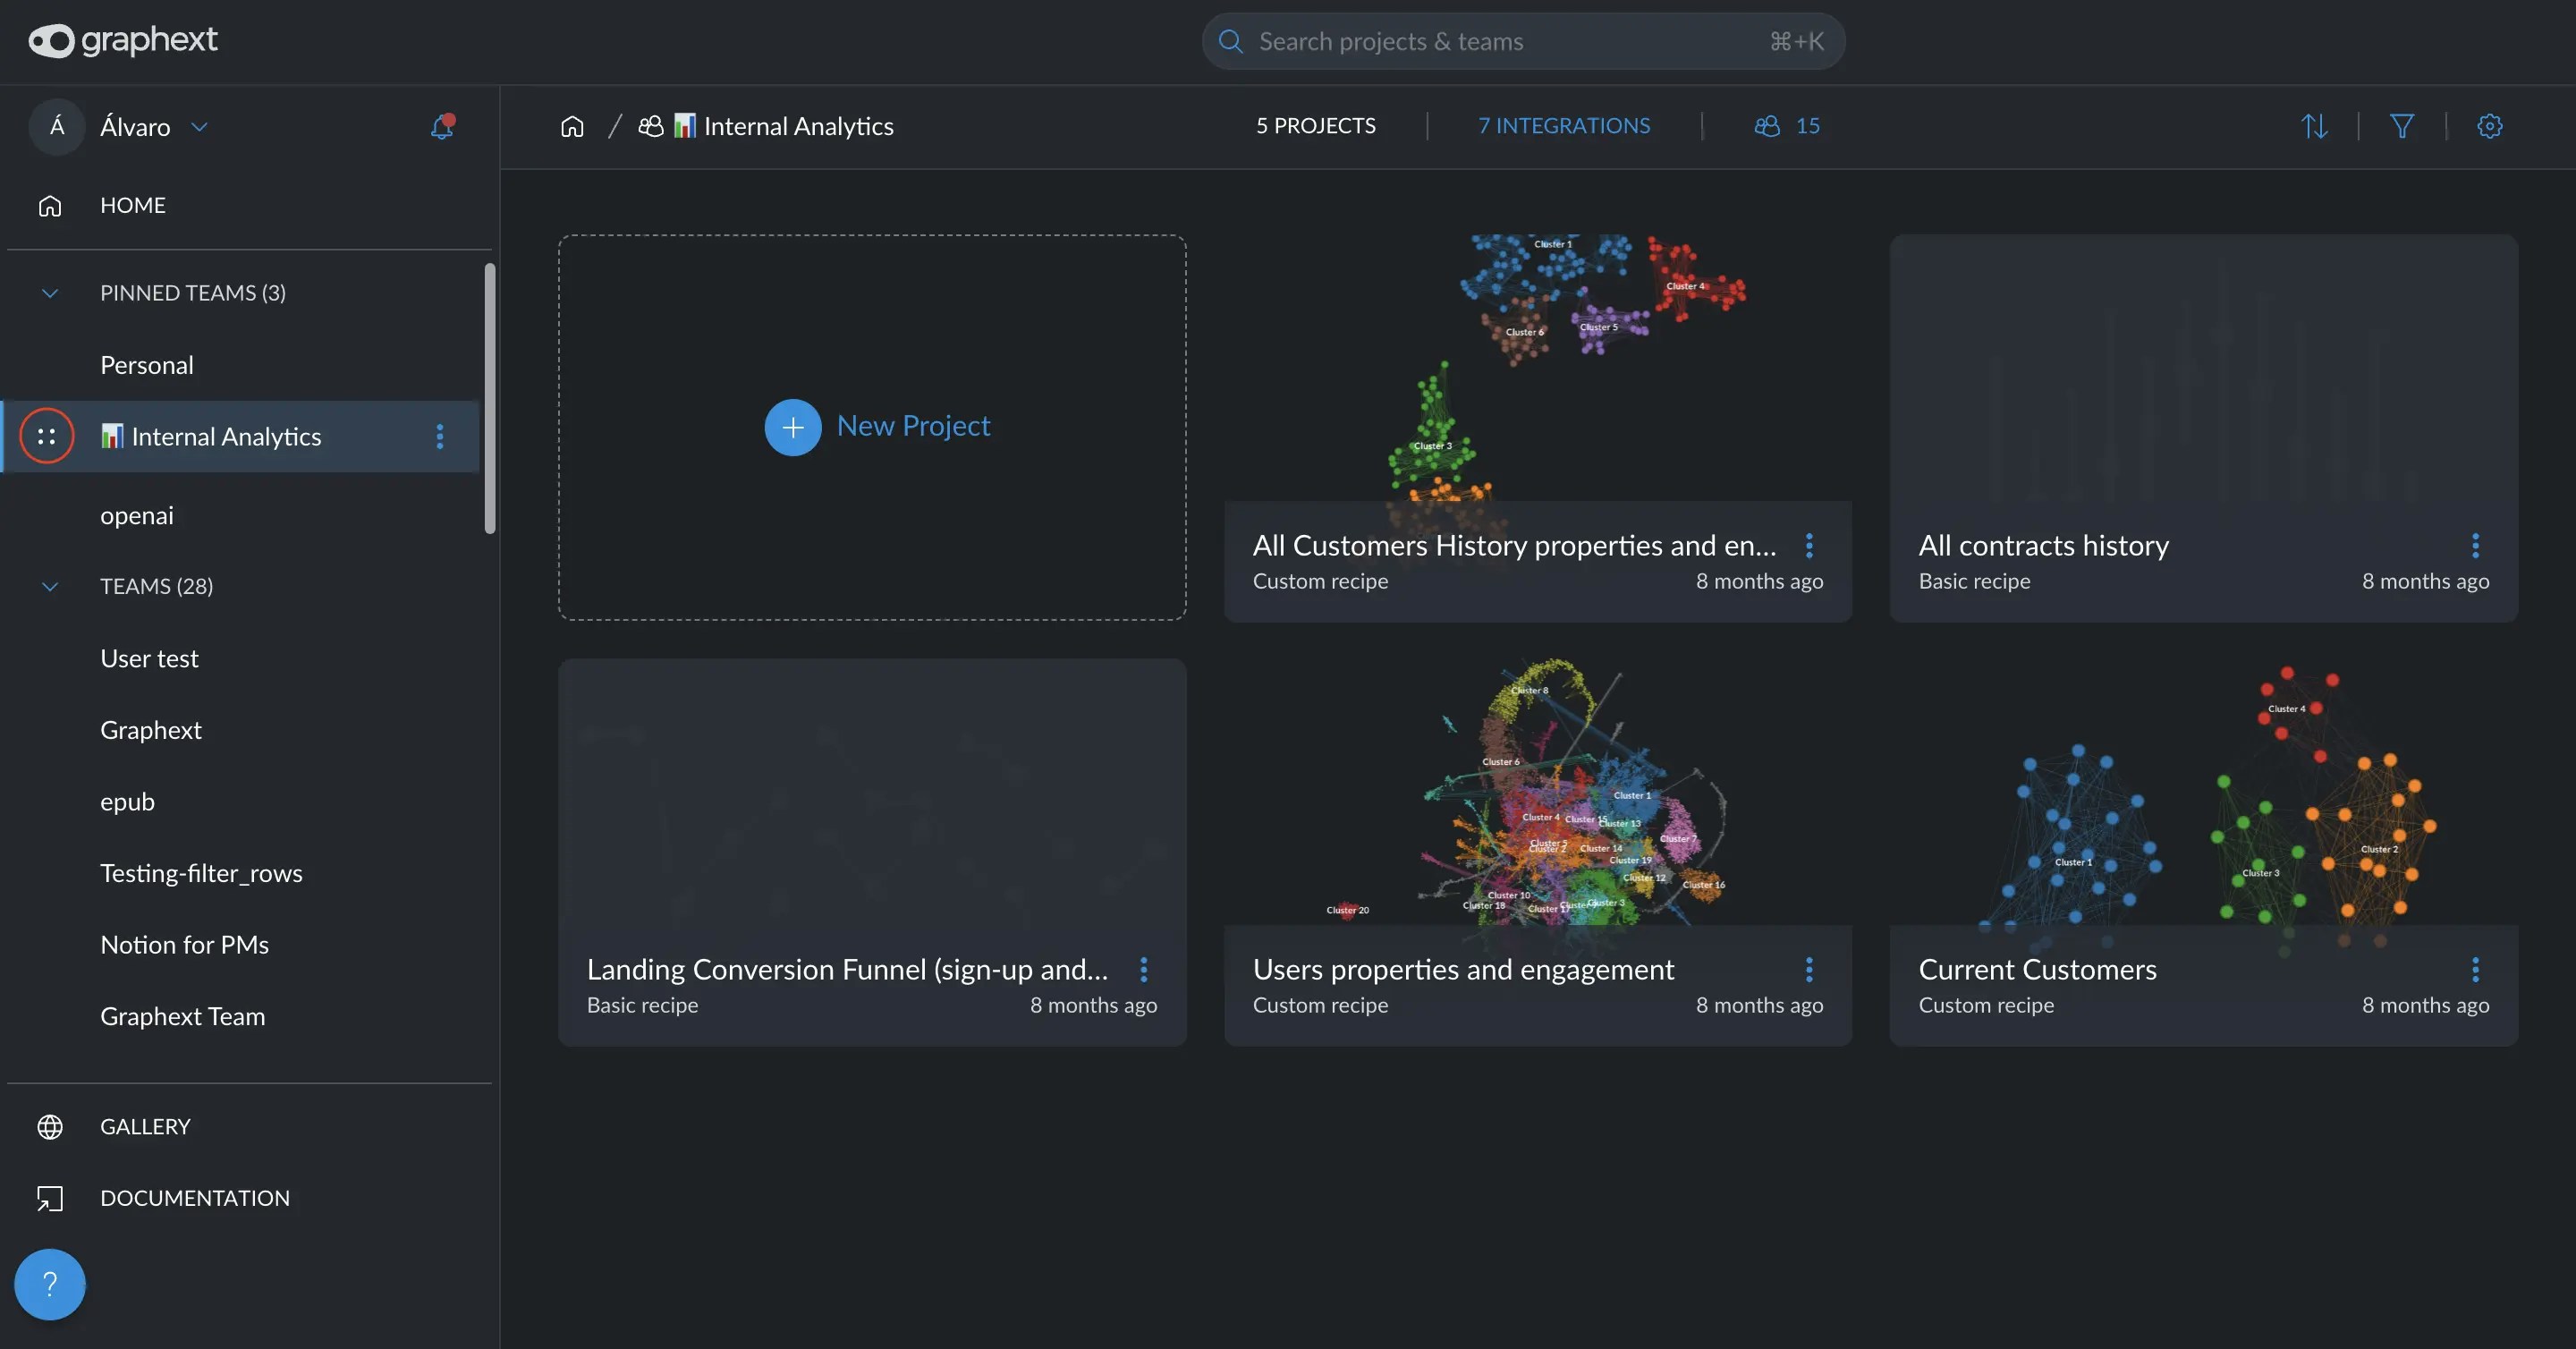
 Once you select **Pin**, the team will automatically move to the top of
your teams list and will be grouped into the **Pinned Teams** section.
Within the **Pinned Teams** section, you have the flexibility to reorder
the teams. Click and hold the icon on the left of each pinned team and
drag it to rearrange the order as you prefer.
Once you select **Pin**, the team will automatically move to the top of
your teams list and will be grouped into the **Pinned Teams** section.
Within the **Pinned Teams** section, you have the flexibility to reorder
the teams. Click and hold the icon on the left of each pinned team and
drag it to rearrange the order as you prefer.
 ## How to rename a team
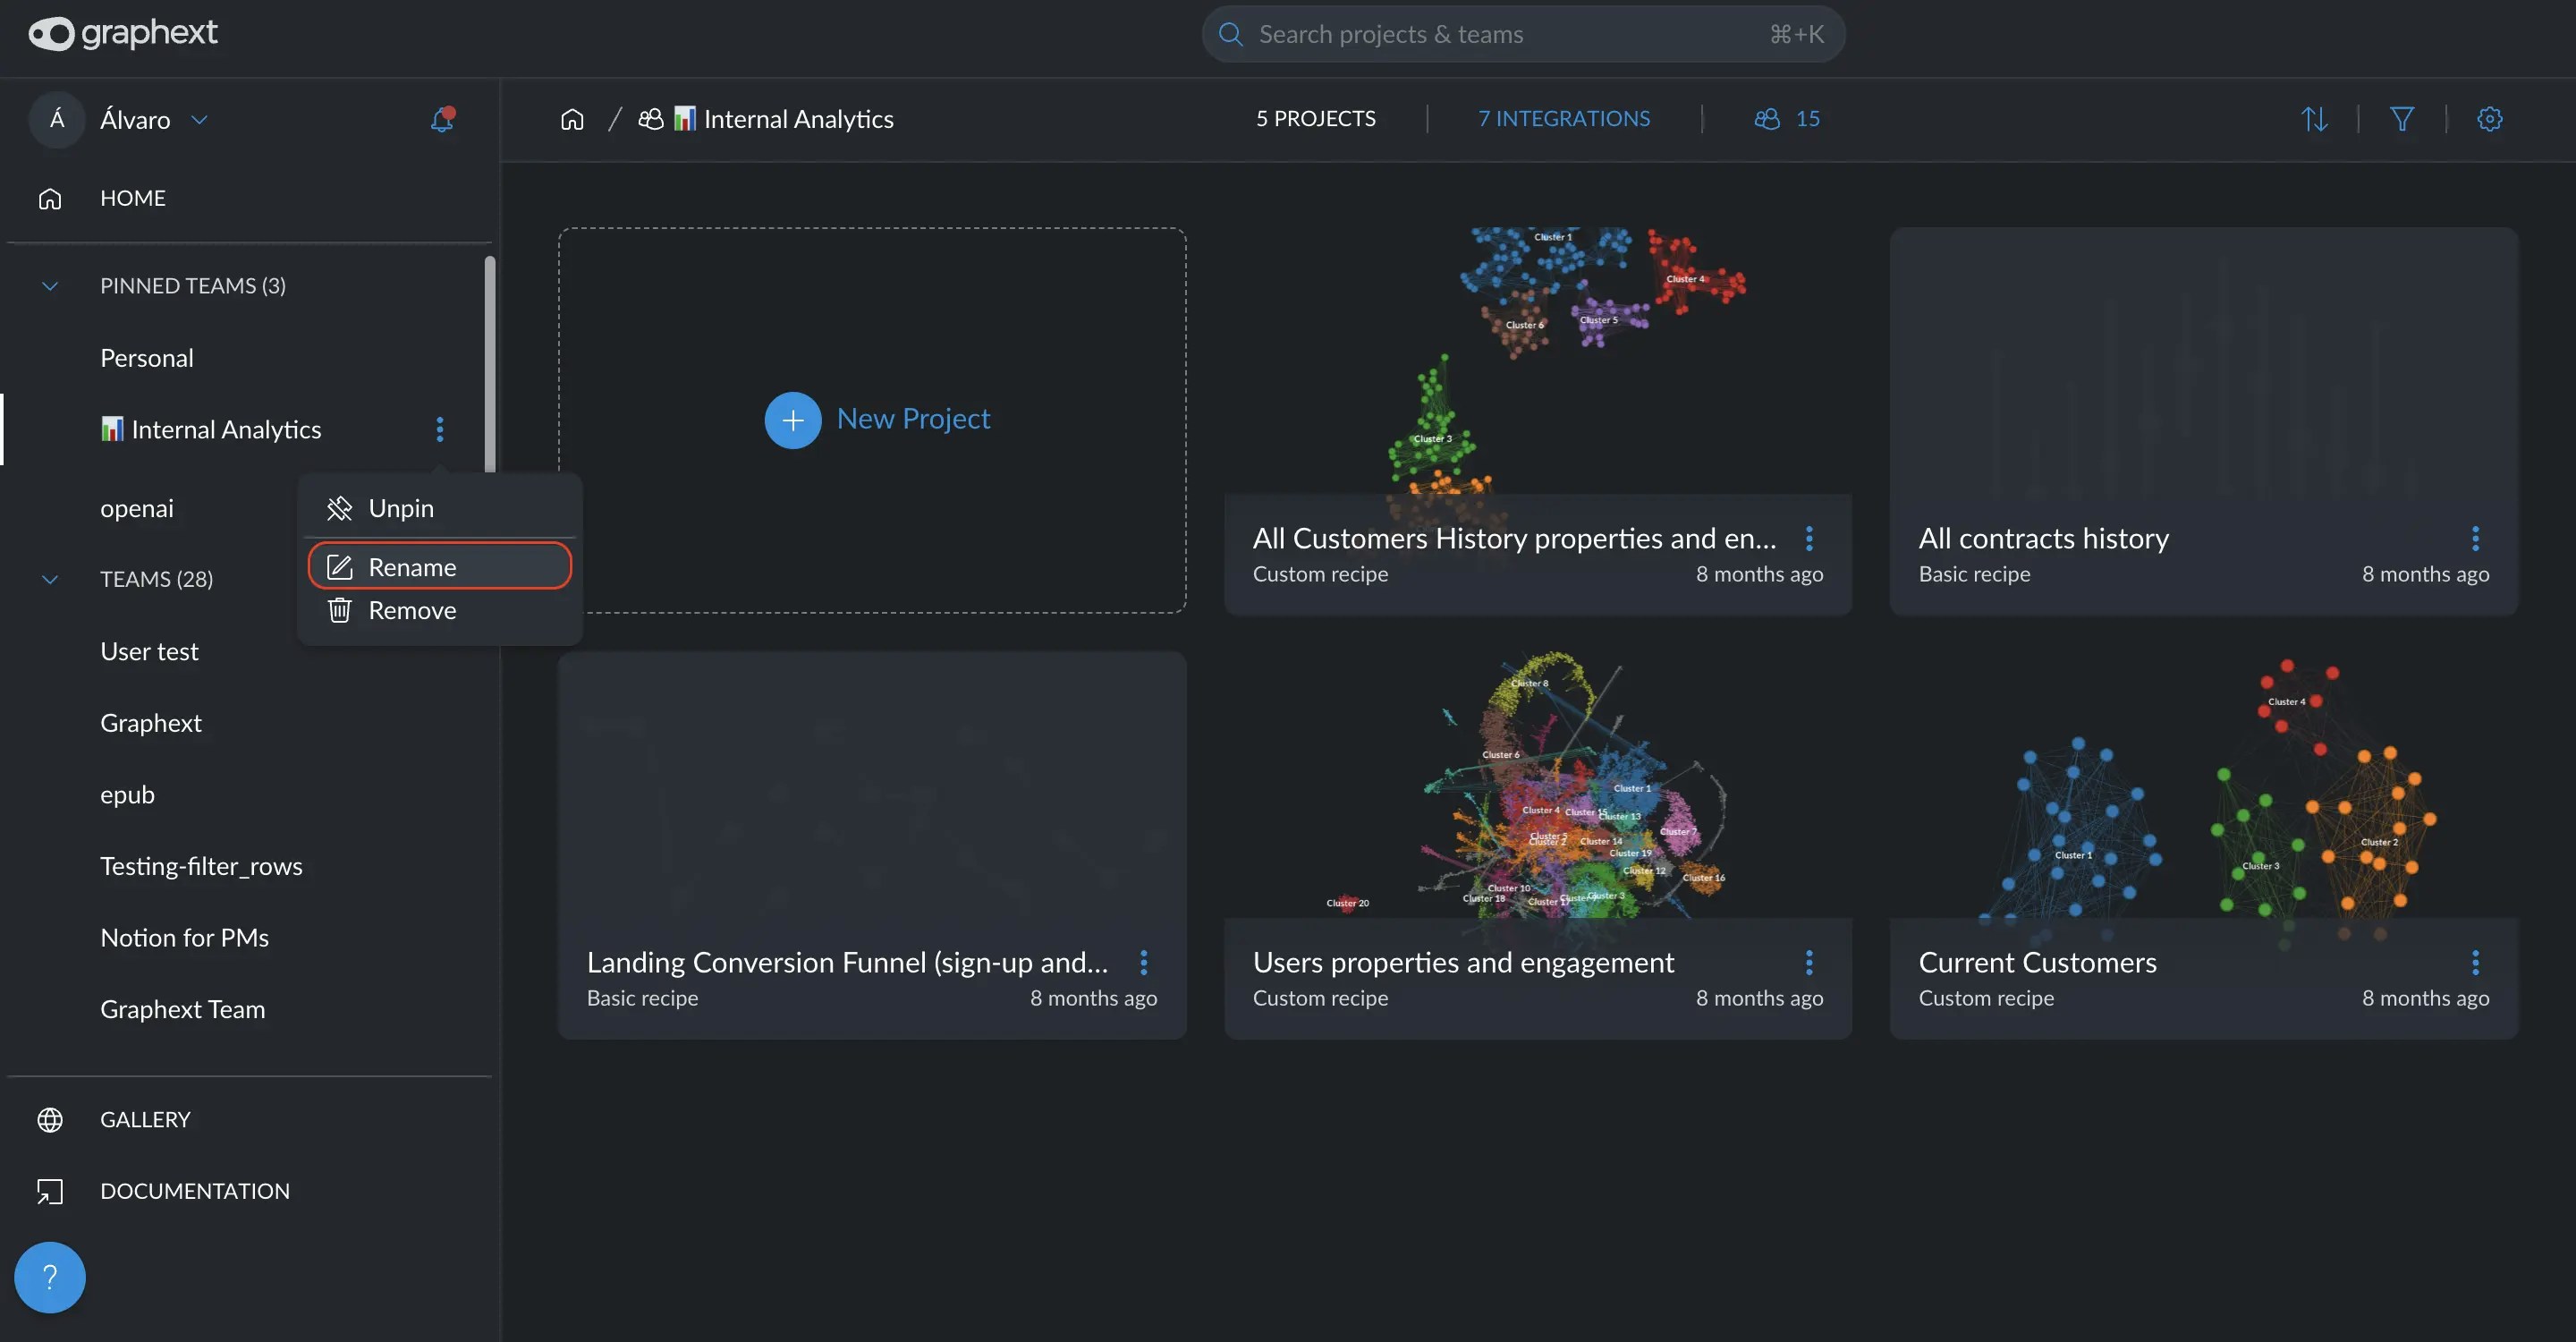
Simply move your cursor over the team you want to rename. A menu icon will appear on the right side of the team's name.
Click on the menu icon. A list of options will appear. From these, select the **Rename** option.
## How to rename a team
Simply move your cursor over the team you want to rename. A menu icon will appear on the right side of the team's name.
Click on the menu icon. A list of options will appear. From these, select the **Rename** option.
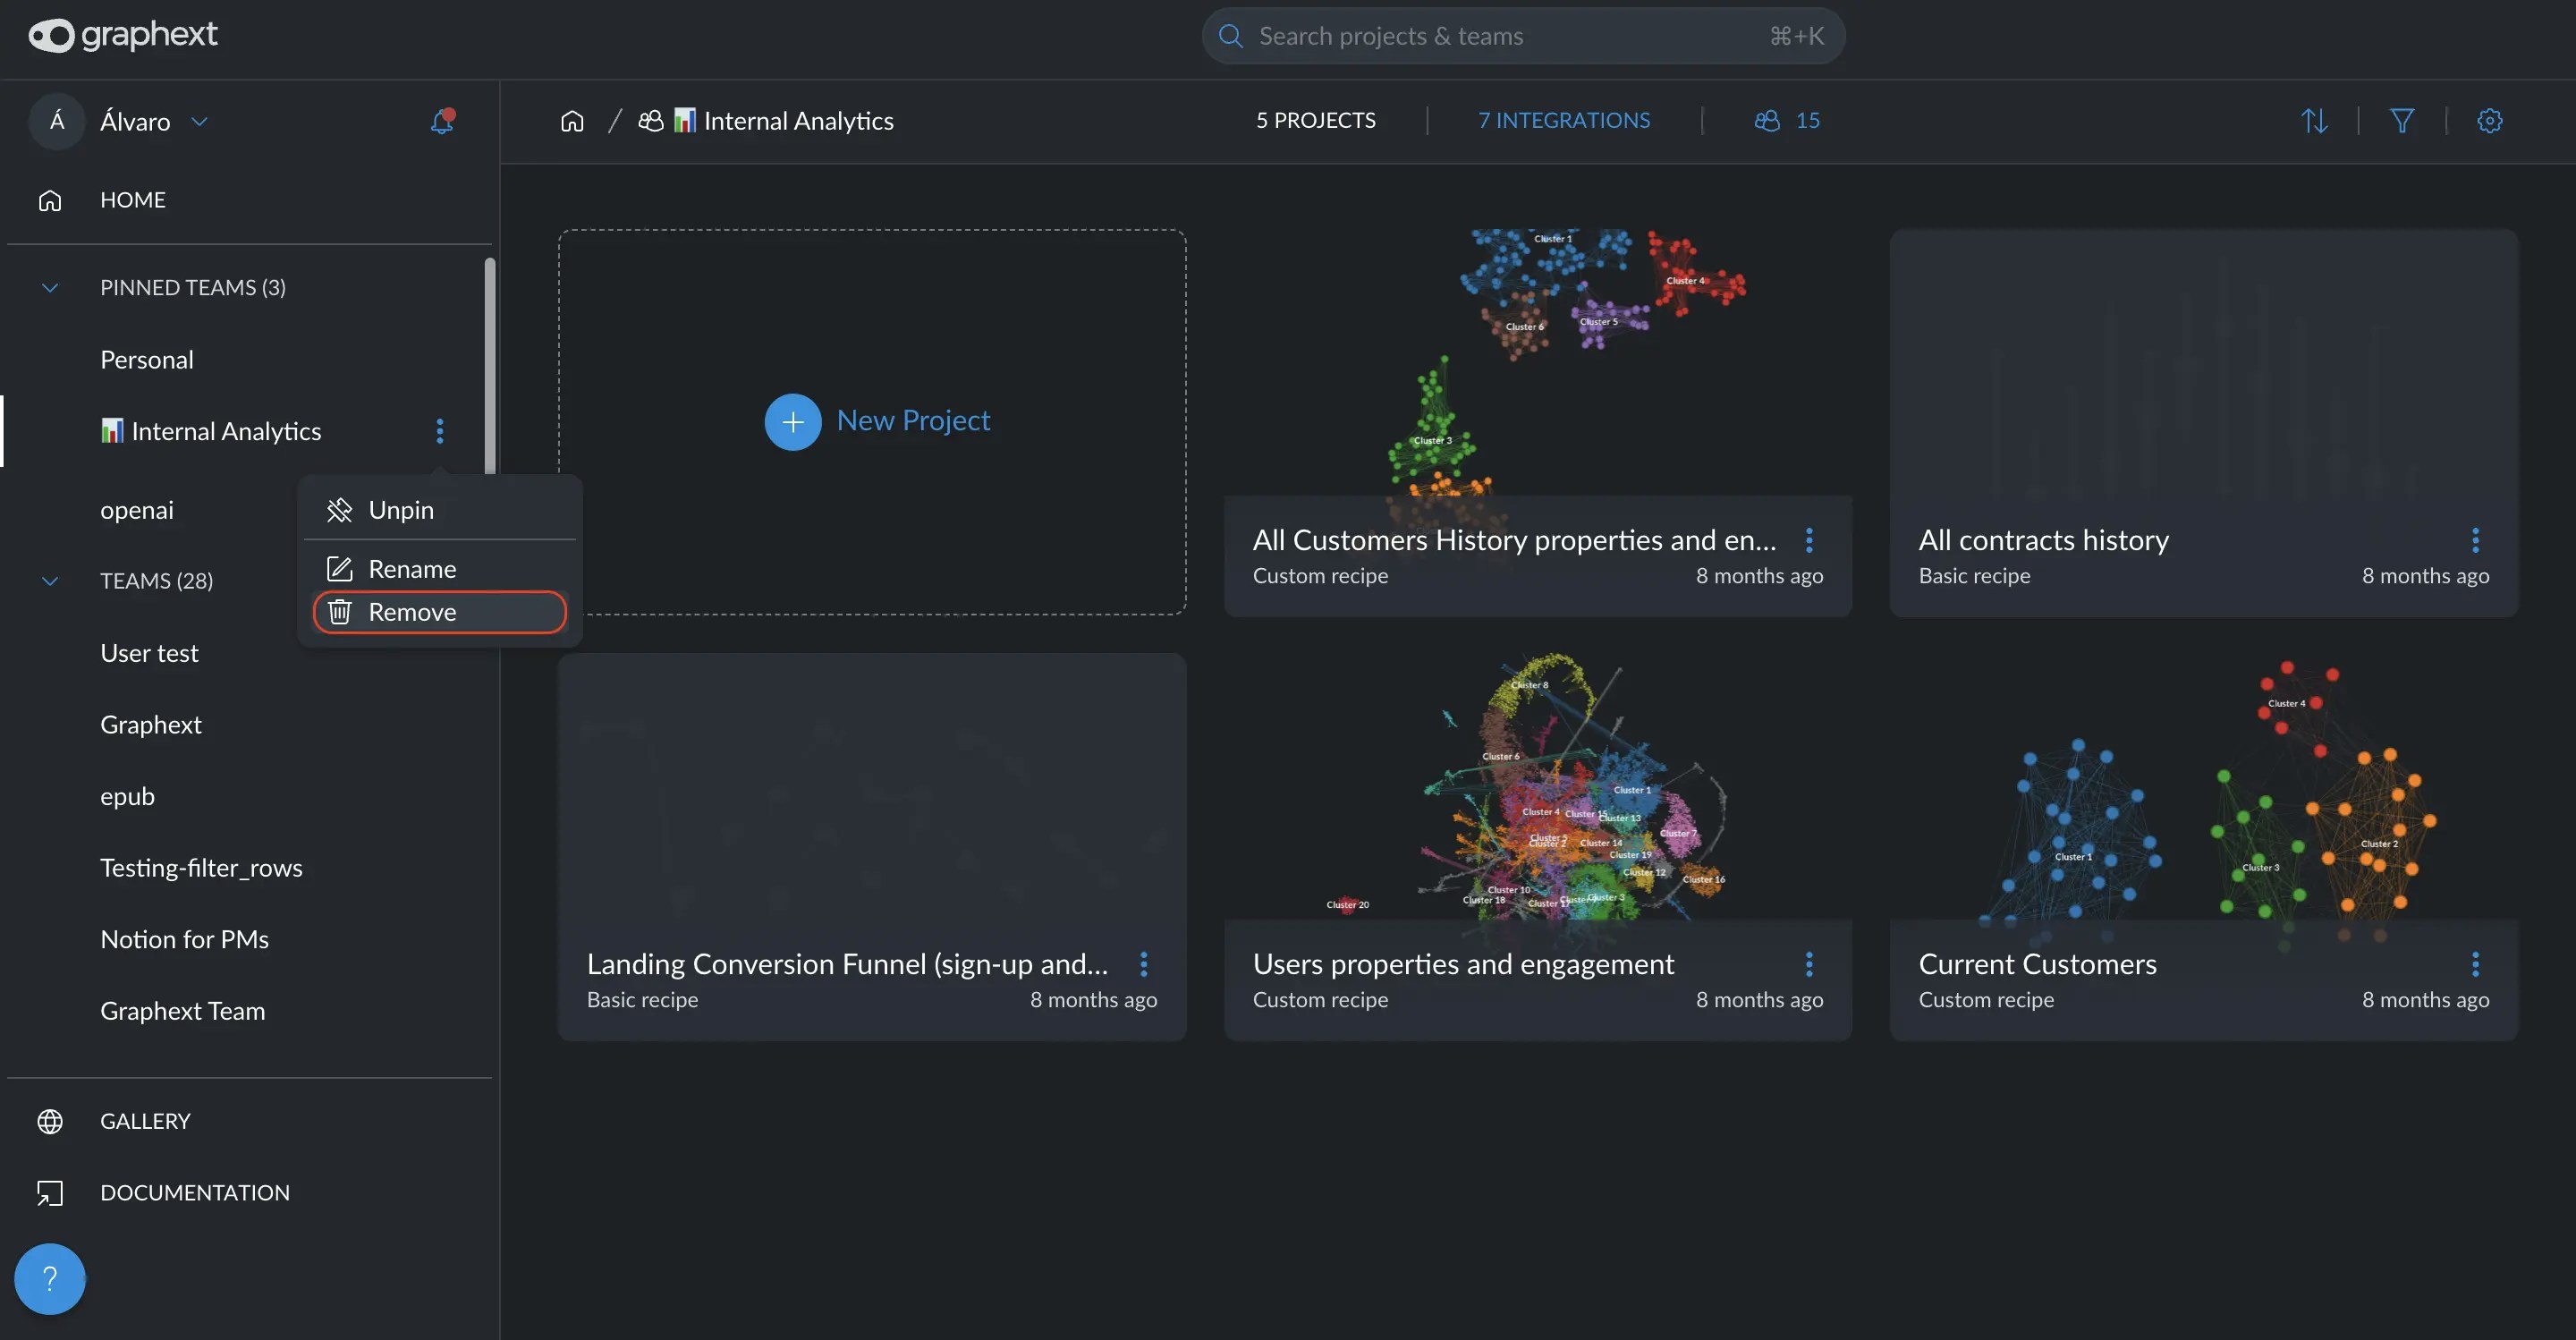
 ## How to remove a team
Simply move your cursor over the team you want to remove. A menu icon will appear on the right side of the team's name.
Click on the menu icon. A list of options will appear. From these, select the **Remove** option.
## How to remove a team
Simply move your cursor over the team you want to remove. A menu icon will appear on the right side of the team's name.
Click on the menu icon. A list of options will appear. From these, select the **Remove** option.
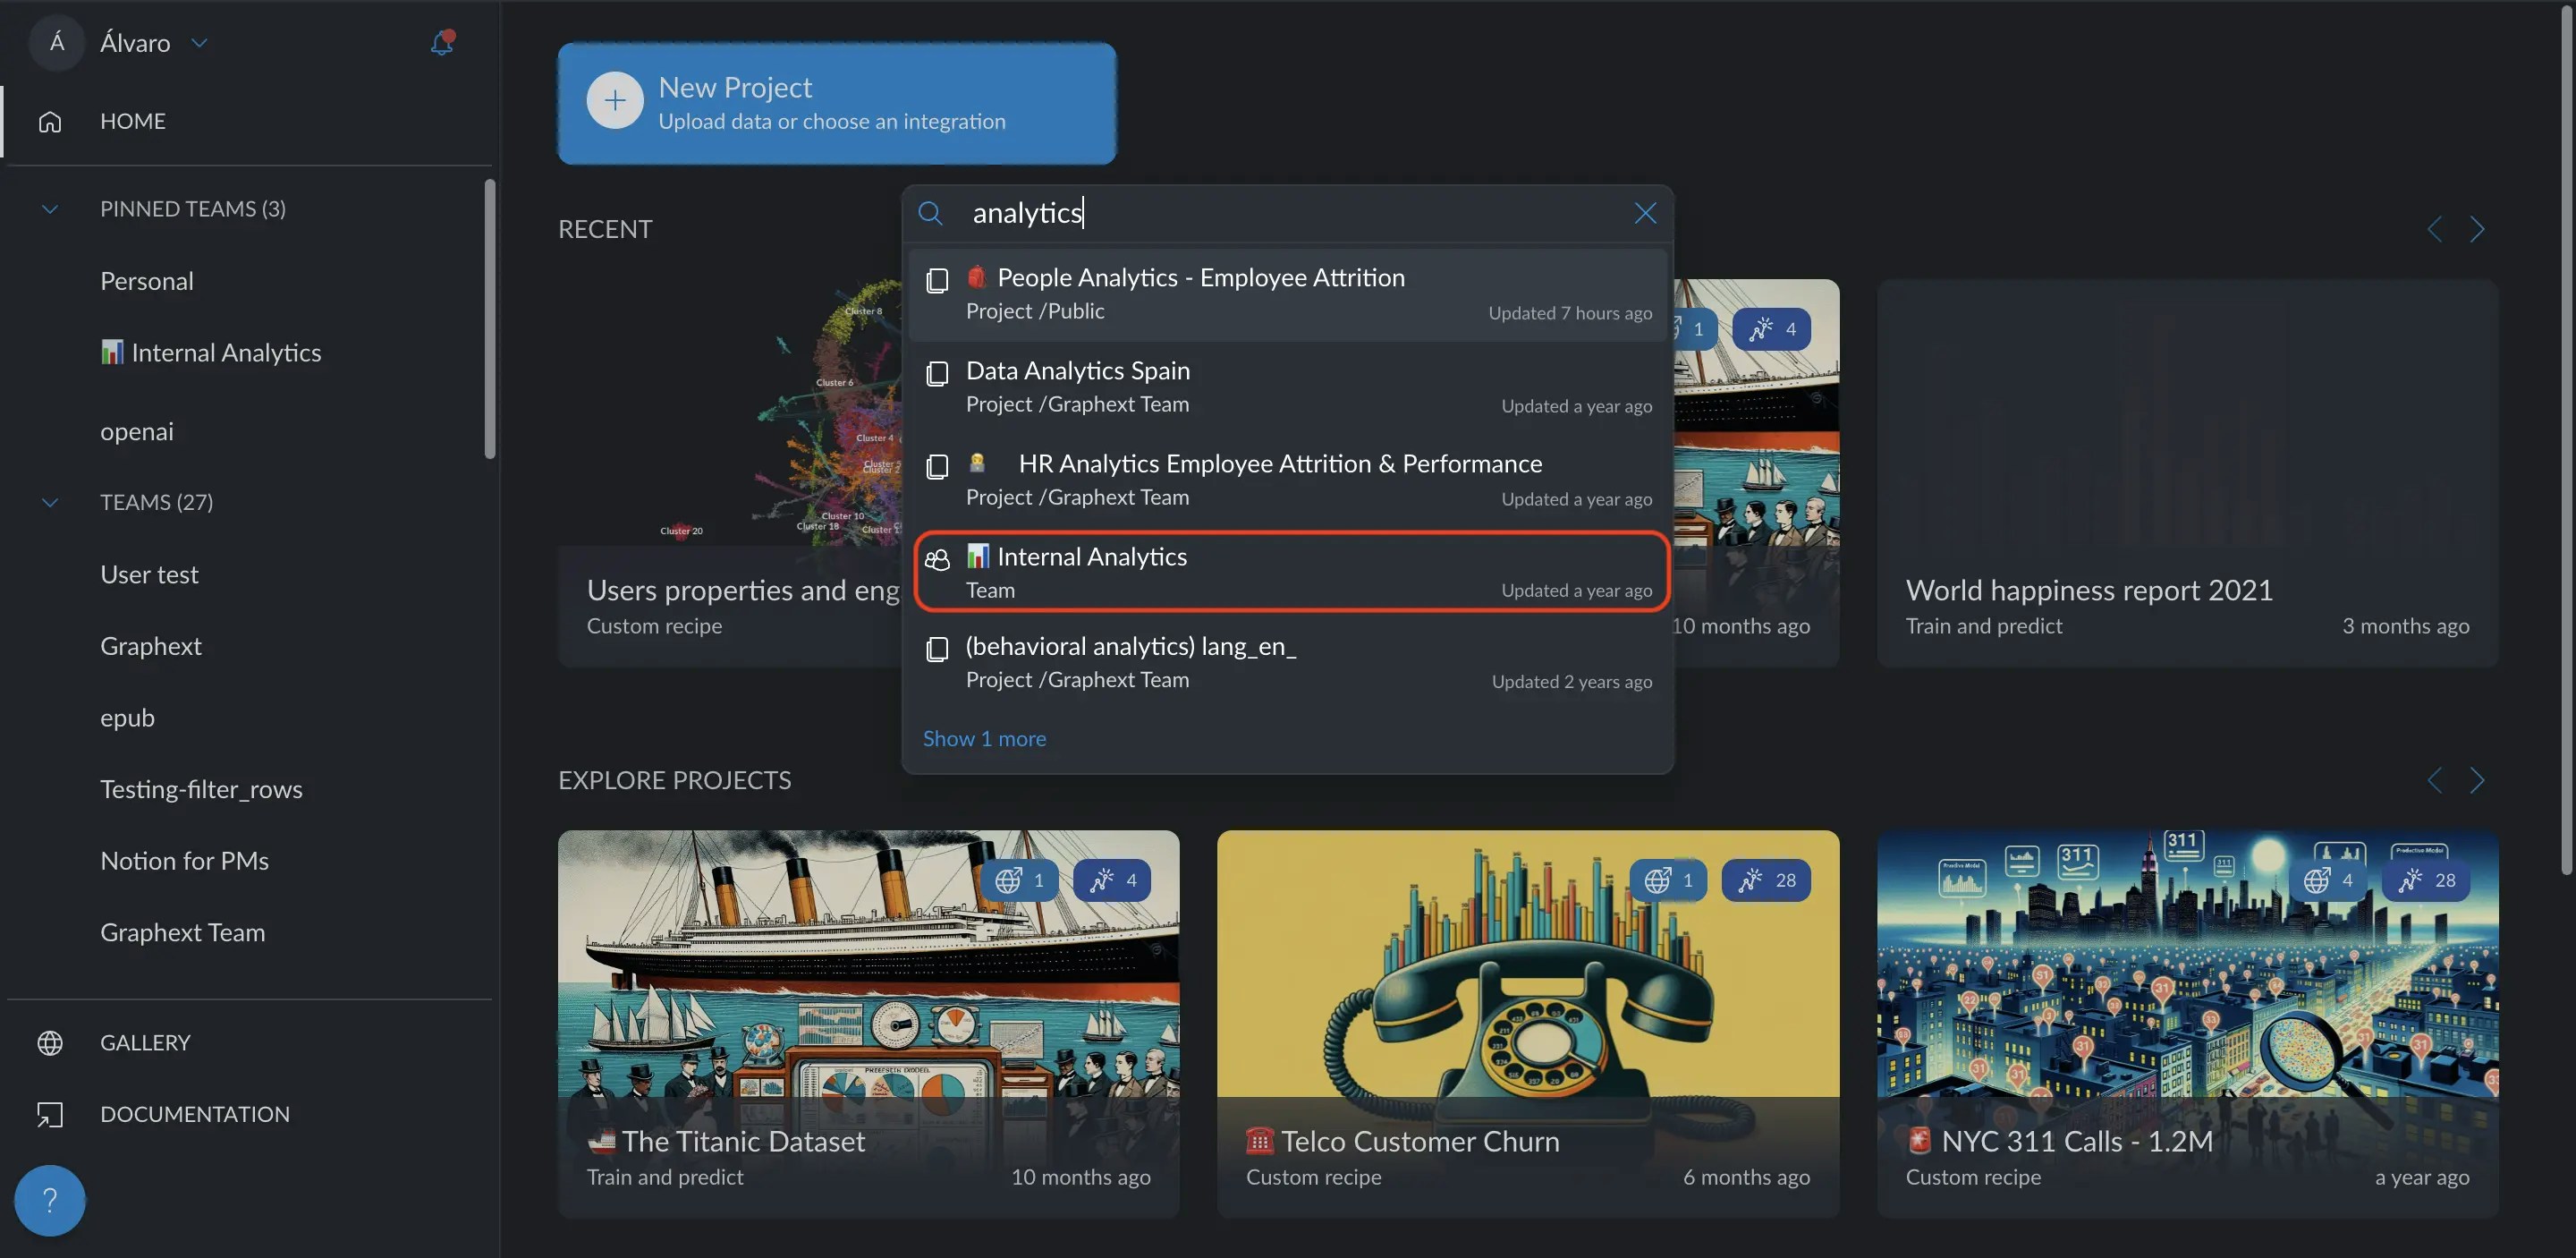
 ## How to search for a team
To locate any team or project, regardless of how extensive your list grows, you can use the **omnibar**.
To access the omninbar you have to options, click on the **search bar at the top** or by using **keyboard shortcuts**. If you are on a Mac, press **Cmd + K**; on Windows, use **Ctrl + K**. This omnibar searches across both teams and projects.
## How to search for a team
To locate any team or project, regardless of how extensive your list grows, you can use the **omnibar**.
To access the omninbar you have to options, click on the **search bar at the top** or by using **keyboard shortcuts**. If you are on a Mac, press **Cmd + K**; on Windows, use **Ctrl + K**. This omnibar searches across both teams and projects.